How to change Joomla 3 & 2.5 template name?
All our templates have their own unique names. After installing Joomla template, its name appears in the list of templates in the Template Manager. It is also visible in the source files of website. In this article, we will describe how you can change template name, since this may be not an easy task for beginner users of Joomla.
Why should I change template name?
In some cases, changing template name can be very useful, especially for web developers. Many of our customers prepare projects based on our Joomla templates for their customers. In such a situation, they often wish to change template name. Some users, simply want to change template name to one that will be related to their business or domain name.
Where to start?
First of all, you can't change template name directly in your Joomla directory, since it is stored in database. The first step is coping the template folder to your local disk. At this stage you will need:
- FTP client such as Filezilla
- FTP server details that can be found in the control panel of your web hosting
Copy the template folder to your local disk.
Connect your FTP server and go to the templates folder in the root installation directory of Joomla.
Select the template folder and copy it to your local disk.
Rename the template folder and files names.
In the next step, you need to change the name of the template folder that you have just copied.

Please note that the template name should contain only lowercase letters.
Now, go to the template-name/language/en-GB directory.
Here you will find the language files, their names should include the template name:
- en-GB.tpl_template-name.ini
- en-GB.tpl_template-name.sys.ini
Please note that in Joomla 3.x templates you will find only one file in this directory.
Edit the templateDetails.xml file.
The templateDetails.xml file is located in the template folder.
At the top of this file you will find the template name that you need to change.

Below, you will find the template description (it appears in the template parameters view on the left side).
For Joomla 3.x templates:

For Joomla 2.5 templates based on the EF 1/2 framework:

For older Joomla 2.5 templates:

Further down, you will find the path to the language files. In the previous step you have changed the names of these files. At this point, you need to change their names as well (not applicable for Joomla 3.x templates):

The last thing to change in this file is the path that appears only in Joomla 2.5 templates based on the EF 1/2 framework:
![]()
Edit the paths in other files.
If you use Joomla 3.x template then you skip this step.
In some Joomla 2.5 templates based on the EF framework and in older Joomla templates, you may need to change the path in other files as well.
In the template folder you can find the error.php and component.php files. Edit them and replace the paths with the new template name if needed:


Next, users of Joomla 2.5 templates based on the EF framework should go to the admin folder in the template directory. Here you will find the optiongroups.php and loader.php files, where you need to change the paths as follows:
![]()

New package and template installation.
You have just edited all files needed. Now, you need to compress the template folder to a zip package and then install the template package via the Extensions -> Extension Manager.
After that, simply set the renamed template as the default one.
Template Parameters.
After installing the renamed template, you may find that you will have to set up all parameters from the beginning. That is why you should leave your old template on the template list, since you can preview all parameters.
For Joomla 3.x templates:
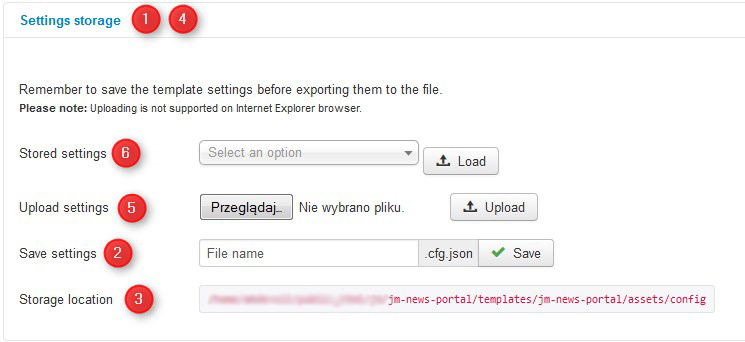
Users of Joomla 3.x templates can use a built-in feature in the EF3 framework, which allows to save the template parameters into the JSON configuration file and then load this file for the renamed template.
This can be done in a few simple steps:

- In the old template parameters go to the Setting storage tab.
- Use the Save settings option to save all parameters. You need to type the file name and click on the Save button.
- In the Storage location you will find the path to the previously created file. Copy this file to your local disk.
- Now, go to the parameters of the renamed template and then go to the Settings storage tab.
- Use the Upload settings option to choose the configuration file from your disk and click on the Upload button.
- In the Stored settings option you need to choose this file and click on the Load button.
In this way, you will load all template parameters from your previous template to the renamed one.