EF4 framework layout builder
Introduce
Layout Builder is a tool included to EF4 Framework that allows customizing layout of your template using a user-friendly interface.
The template layout consists of multiple blocks. Each block may contain one or more module positions. Using Layout Builder you are able to:
- change the template width in pixels or percent
- change the gutter size
- change the order of blocks
- enable or disable the full-width recalculation
- enable or disable full width for a section
- change the order of main columns
- change the width of main columns basing on Bootstrap grid size
- choose the number of modules in a flexiblock
- assign module positions
- exclude unused blocks
- hide a block or a single module depending on the screen size
- change the width of modules in a flexiblock depending on the screen size
- save your settings and assign them to selected menu items
Layout configuration has never been easier.
Configuration
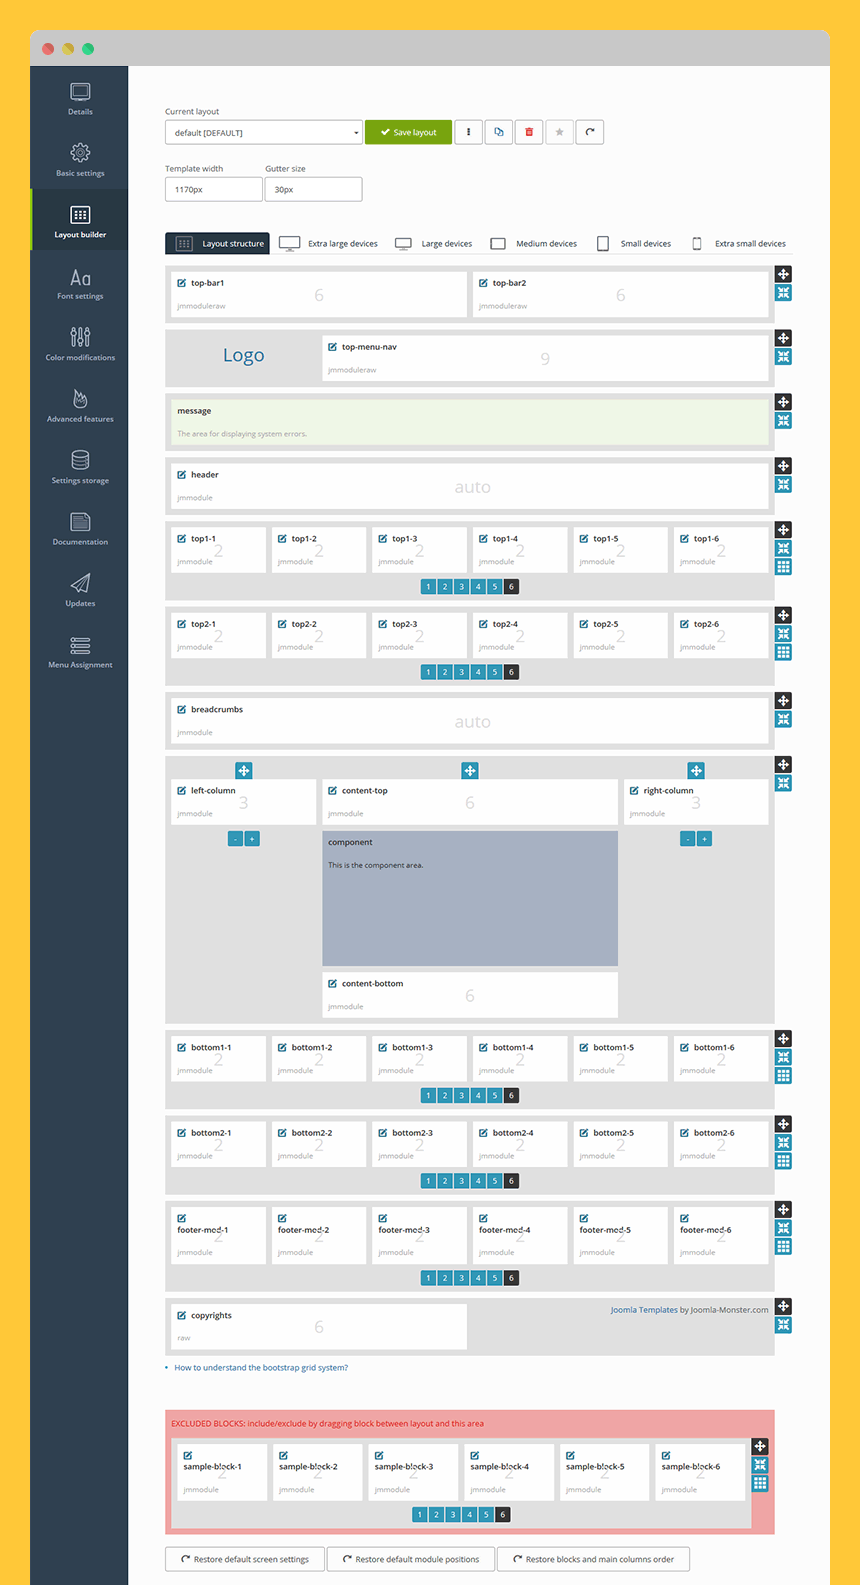
Layout Builder is located in the back-end of your template:
Extensions -> Template Manager -> [template_name]
Click on the Layout Builder tab:
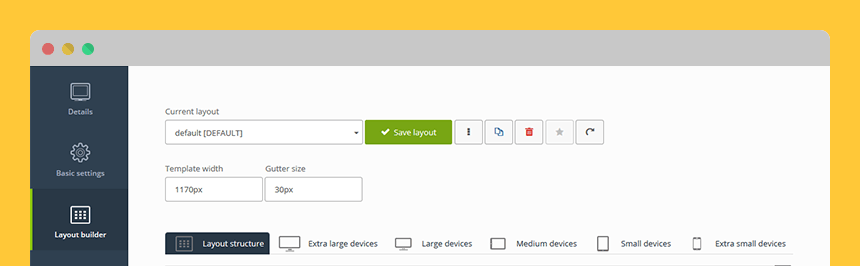
Current Layout - choose a layout from the dropdown that you want to edit. This area allows you to:
- save changes in layout
- duplicate layout
- remove layout
- set layout as default
- restore layout to default settings
Template width – enter the template width in percent or pixels.
Gutter size – enter the gutter size in percent or pixels.
The gutter is a space between blocks, modules and other elements on the site.
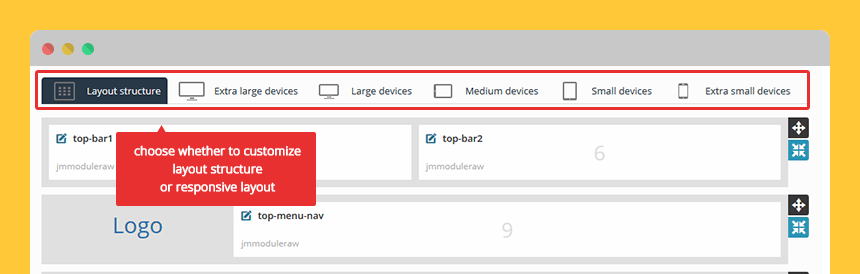
There are 2 sections that you may customize: layout structure and responsive layout.
Customize layout structure
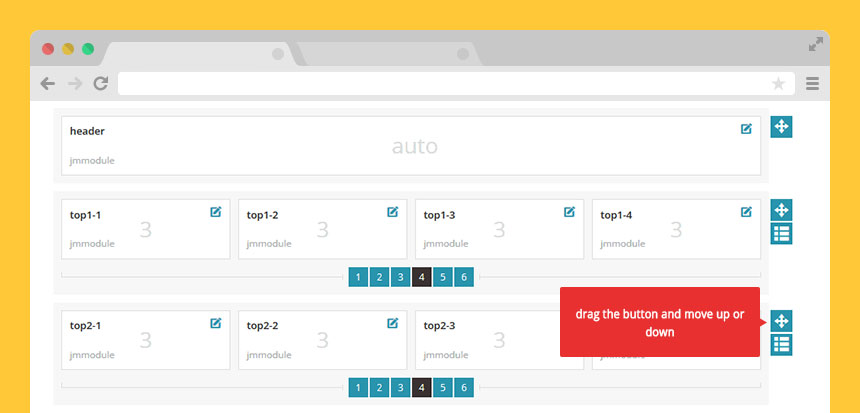
Change the order of blocks:
TIP: Hover on the image to see the animation.
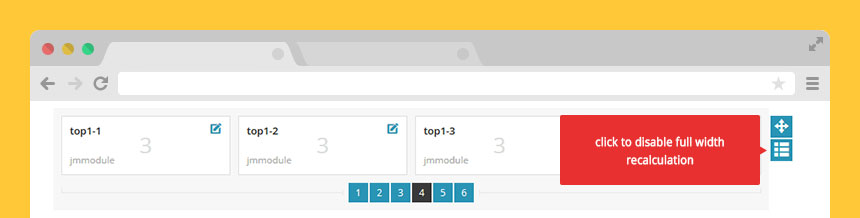
Enable or disable the full-width recalculation:
Read more about this feature
TIP: Hover on the image to see the animation.
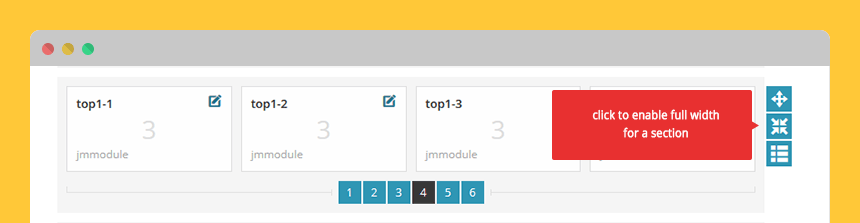
Enable or disable full width for a section:
TIP: Hover on the image to see the animation.
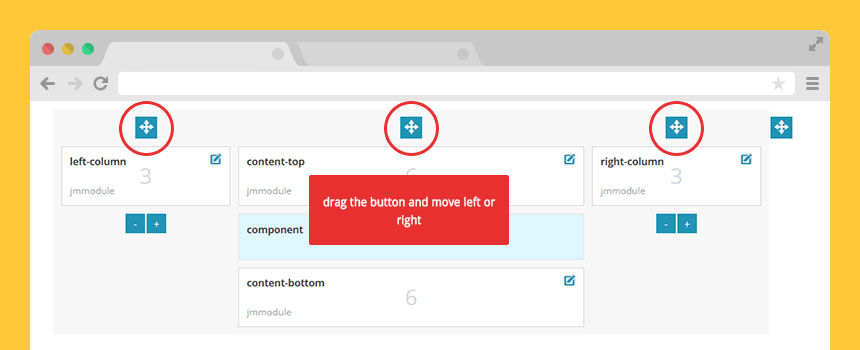
Change the order of main columns:
TIP: Hover on the image to see the animation.
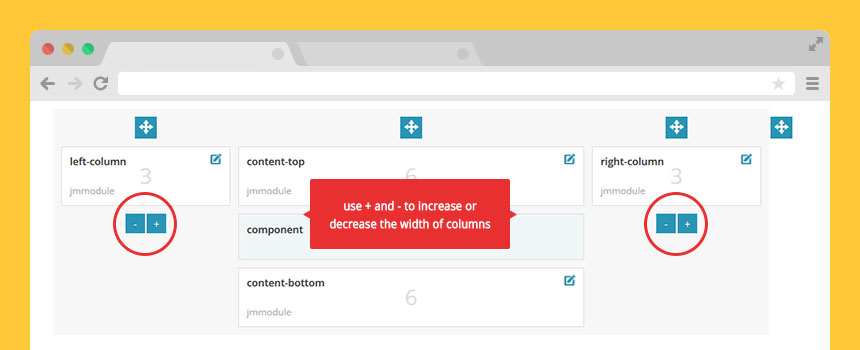
Change the width of main columns:
TIP: Hover on the image to see the animation.
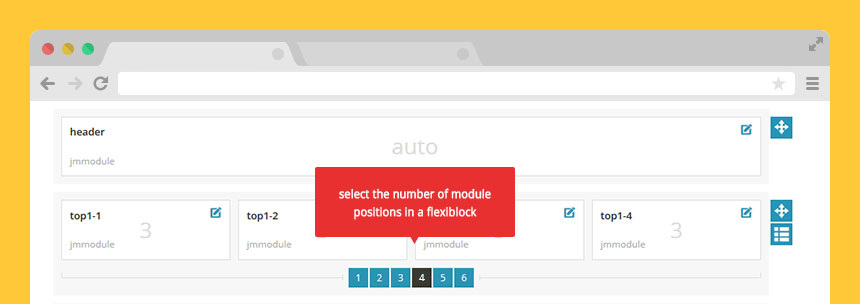
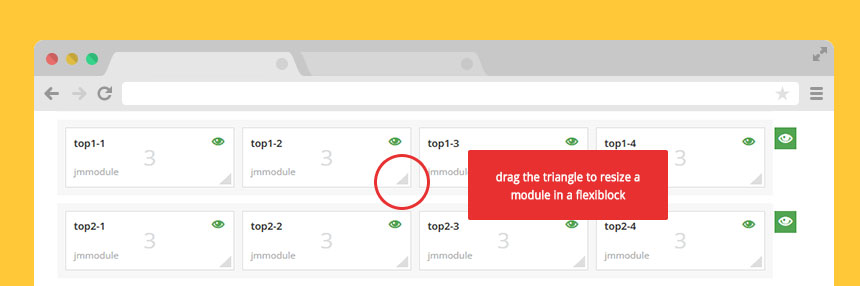
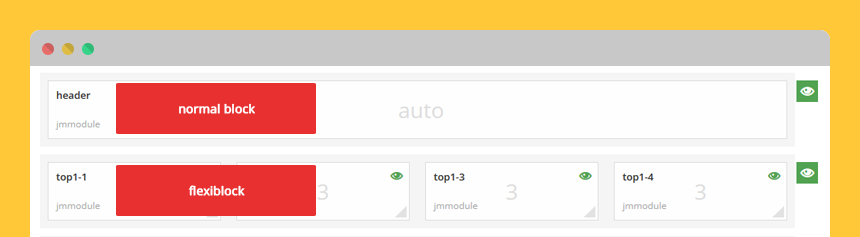
Choose the number of modules in a flexiblock:
TIP: Hover on the image to see the animation.
Assign module positions:
TIP: Hover on the image to see the animation.

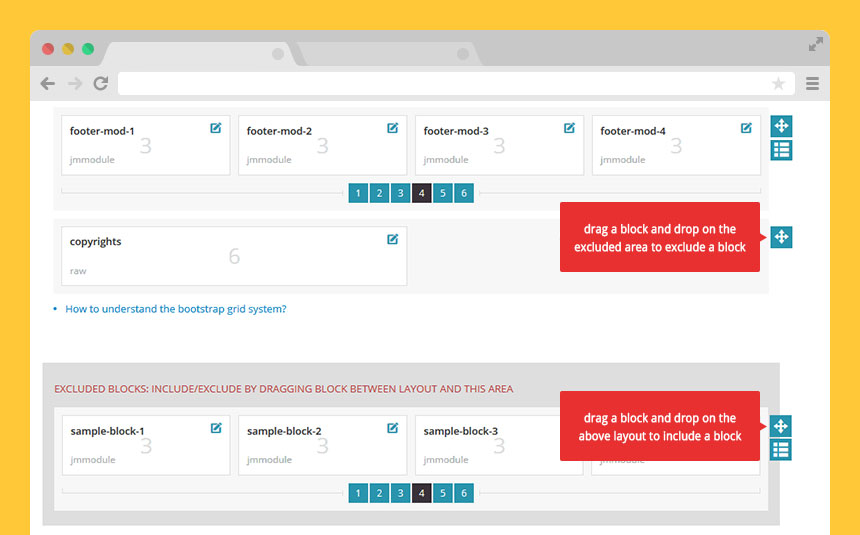
Exclude unused blocks:
TIP: Hover on the image to see the animation.
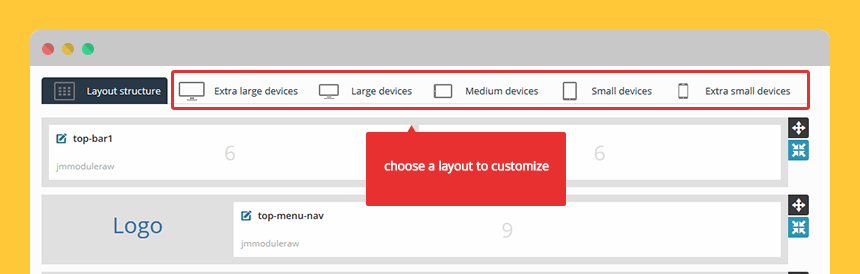
Customize responsive layout
On the top, you can choose which layout you want to customize.
Available layouts:
- Large Screen - 1200px and above, usually desktops
- Normal Screen - 980px-1199px, usually landscape tablets and desktops
- Medium Screen - 768px-979px, usually tablets
- Small Screen - 481px-767px, usually portrait tablets and landscape mobiles
- Extra Small Screen - 480x and below, usually mobiles
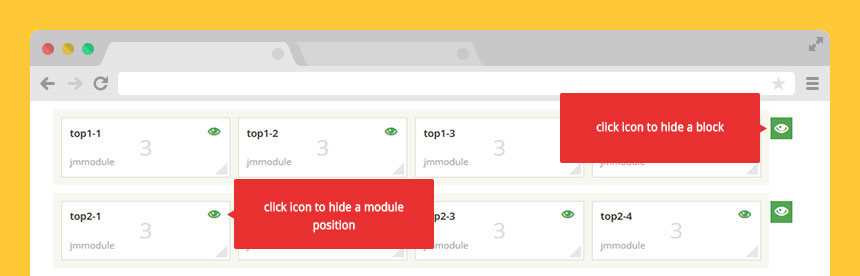
Hide a block or a single module depending on the screen size:
TIP: Hover on the image to see the animation.
Change the width of modules in a flexiblock depending on the screen size:
TIP: Hover on the image to see the animation.
What does the full-width recalculation mean?
There are two ways of displaying modules in a flexiblock.
Option 1: Full width recalculation enabled (default)
In a flexiblock, if any module will be not published, then the width of the rest modules will be automatically recalculated to fit the full width.
Let's see on examples:
a) modules are equally divided on the responsive layout tab:
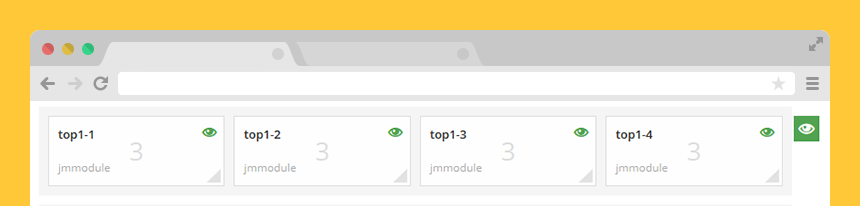
Basing on the Bootstrap grid size, each module has the span3 width:
span3 | span3 | span3 | span3
If one of them is missing, then each module has the span4 width:
span4 | span4 | span4
If two are missing, then each module has the span6 width:
span6 | span6
If only one module is displayed then it has the span12 width.
b) modules are not equally divided on the responsive layout tab:
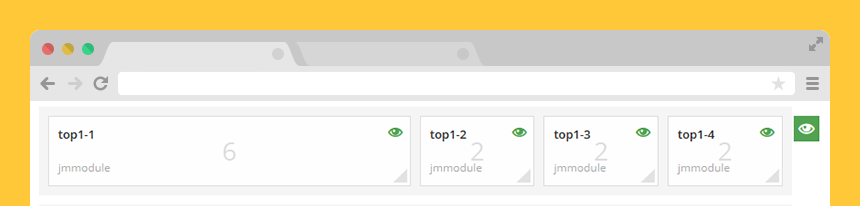
Basing on the Bootstrap grid size, let's suppose that the first module has the span6 width, all the rest modules has the span2 width:
span6 | span2 | span2 | span2
If we unpublish the second module, its width will be divided starting from the next module to the missing one (span1 per module):
span6 | span3 | span3
Option 2: Full-width recalculation disabled
If you want to have more control to the width of modules in a flexiblock, you can disable the full-width recalculation. All modules will take exactly the same size which you have set on the responsive layout tab.
NOTEIf one of the modules will be not published in a flexiblock then there will be an empty gap on your site.
INFOIf you want to display a different number of modules in a flexiblock on some pages, you can simply copy the layout, change the number of modules and assign it to the menu items you need.
Add a new layout
There is a possibility to create as many layouts as you need. This feature may be useful for you if you would like to assign different layout styles to selected pages on your site.
There are 2 different ways to add a new layout: copy layout in Layout Builder or add a file manually.
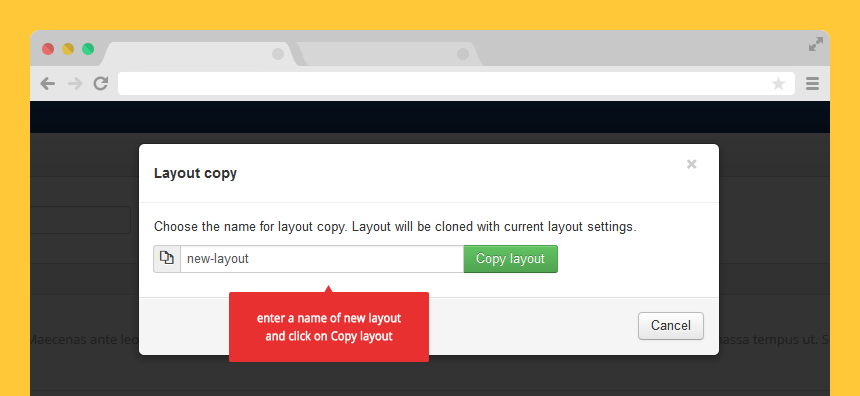
Copy layout in Layout Builder
Go to the Layout Builder tab in the template parameters. Simply click on "Copy layout" and follow the onscreen instructions:
Step 1:
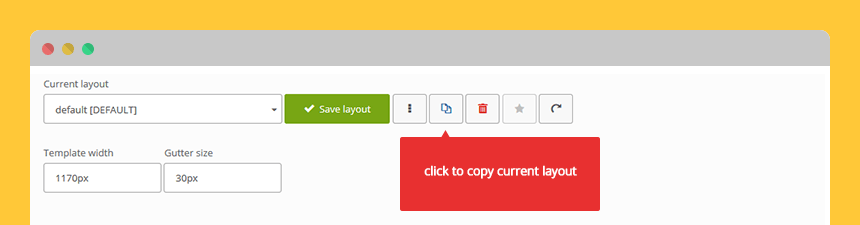
Step 2:
The new layout will be available on the list as well as it will appear as a file in the following directory:
/templates/[template_name]/tpl/
Add a file manually
Go to the following directory on your server:
/templates/[template_name]/tpl/
Copy the default.php file and save as another file in the same directory.

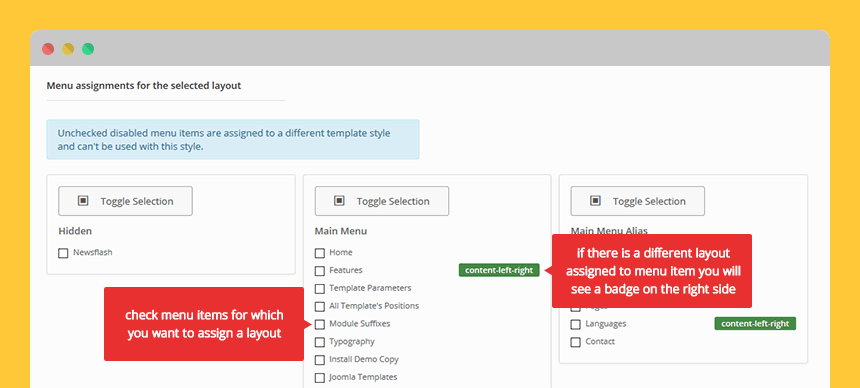
Assign a layout to menu items
Once you have created a new layout, you can assign it to selected menu items. This option is very useful if you want to use different layouts for many pages. It is also very useful if you have disabled the full-width recalculation and you want to display a different number of modules in a flexiblock on some pages.
To assign a layout to menu items you need to click on the following tab:

Select menu items for which you want to assign a layout:
Blocks structure
Each layout contains blocks and modules. Using Layout Builder, you are able to change the order of blocks, you can assign module positions and lot more. However, if you would like to add a new block or edit the block structure then you need to edit a layout file.
Once you have created a new layout file, you can edit it and customize.
The block structure is defined using the following code:
// define default blocks and their default order (can be changed in layout builder)
$blocks = $this->getBlocks('top-bar,topmenu,system-message,header,top1,top2,main,bottom1,bottom2,footer-mod,footer');
If you would like to add a new block to a layout, you can do it as follows:
$blocks = $this->getBlocks('top-bar,topmenu,system-message,header,top1,top2,main,bottom1,bottom2,footer-mod,footer,block-name'); //block-name addedThe block name used in the above code should be the same as the block file name. More about creating a new block you will find out in the next chapter.
Add a new block
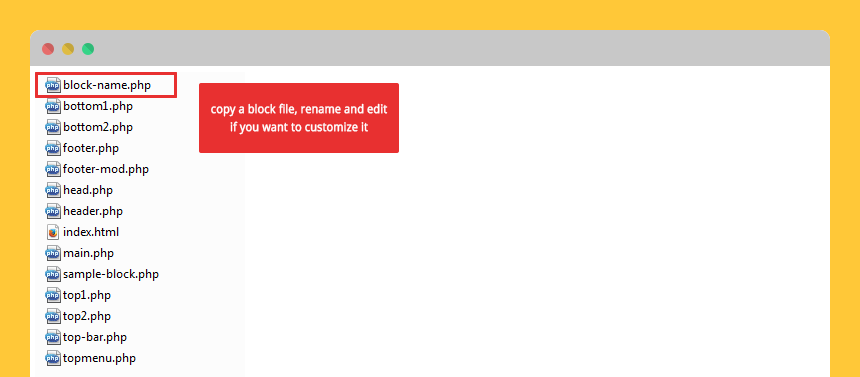
Once you have added a new block to a layout, you need to create a block file.
All blocks are located in the following directory:
/templates/[template_name]/tpl/blocks/
The created block should have the same name as the block name in a layout file.
Override an existing block or layout file
Overriding is the safest method if you want to modify an existing block or layout especially if you are using a ready made template from a template provider like Joomla-Monster.
For example, let's override the topmenu block. You need to copy the file:
/templates/[template_name]/tpl/blocks/topmenu.php
To the following location:
/templates/[template_name]/html/[template_name]/tpl/blocks/topmenu.php
Now, you can modify the file to suit your needs and you will not lose your changes after updating the template files.
Add a new module position
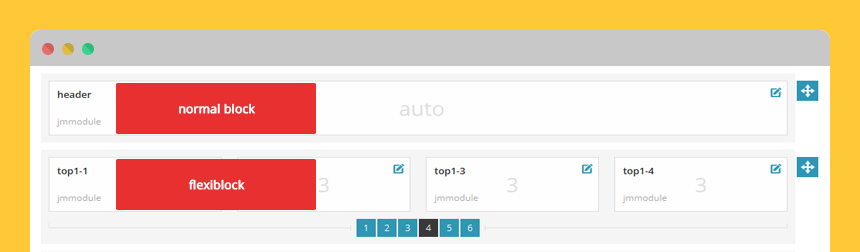
There are two ways of including module positions to a block file: single module and flexiblock.
Single module
If you need to add a single module, then the code looks as follows:
<jdoc:include type="modules" name="<?php echo $this->getPosition('position_name') ?>" style="jmmodule" />Take a look on example:
<?php if($this->checkModules('header')) : ?>

<section id="jm-header" class="<?php echo $this->getClass('block#header') ?>">

    <div class="container-fluid">

        <jdoc:include type="modules" name="<?php echo $this->getPosition('header') ?>" style="jmmodule" />

    </div>

</section>

<?php endif; ?>
Flexiblock
Using a flexiblock you can display up to 6 modules in a row. A flexiblock gives you additional settings in Layout Builder:
Customize layout structure tab:
Customize responsive layout tab:
If you need to add a flexiblock, then the code looks as follows:
<?php echo $this->renderFlexiblock('position_name','jmmodule'); ?>Take a look on example:
<?php if($this->countFlexiblock('top1')) : ?>

<section id="jm-top1" class="<?php echo $this->getClass('block#top1') ?>">

    <div class="container-fluid">

        <?php echo $this->renderFlexiblock('top1','jmmodule'); ?>

    </div>

</section>

<?php endif; ?>
Define a module position
Once you have created a module position, you need to define it in the following file:
/templates/[template_name]/templateDetails.xml
You can do it as follows:
<positions>

        <position>top-bar1</position>

        <position>top-bar2</position>

        <position>top-menu-nav</position>

        <position>header</position>

        <position>position_name</position> <!-- your new module position -->

</positions>
Load a style sheet
For each layout, you can load a specific style sheet. This feature may be useful for you when you have some different styles for a layout and you do not want to include them to all layouts. It may have a positive impact on the speed of your site loading.
Step 1: Create a LESS file
First of all, you need to create a less file. The file should be located in the following directory:
/templates/[template_name]/less/
Step 2: Load the created file
Next, edit a layout file from the following directory:
/templates/[template_name]/tpl
In the head section, you need to add the following code:
<?php if (defined('JMF_TPL_URL') && defined('JMF_TH_TEMPLATE')) {

  $this->addCompiledStyleSheet(JPath::clean(JMF_TPL_URL.'less/new-layout.less'), true, JMF_TH_TEMPLATE);

} ?>
Take a look on example:
<head>

    <?php $this->renderBlock('head'); ?>

    <?php if (defined('JMF_TPL_URL') && defined('JMF_TH_TEMPLATE')) {

      $this->addCompiledStyleSheet(JPath::clean(JMF_TPL_URL.'less/new-layout.less'), true, JMF_TH_TEMPLATE);

    } ?>


</head>
Step 3: Add styles
Now, you can add LESS or CSS styles to the created LESS file.
You should remember to import variables and mixins if you want to take advantage of them:
/* ====================

   VARIABLES import

   ==================== */


@import "template_variables.less";

@import "bootstrap_variables.less";


/* ====================

   MIXINS import

   ==================== */


@import "override/ltr/mixins.less";

@import "../../../plugins/system/jmframework/includes/assets/template/bootstrap/less-ext/mixins-ext.less"; //JM extended mixins

@import "template_mixins.less";